Cloud Datastore (Beta) page in Jitterbit Management Console
Introduction
The Cloud Datastore (Beta) page of the Management Console lets Harmony organization administrators create and manage key and status storages for Jitterbit Cloud Datastore (Beta). These storages provide temporary and long-term data storage that the Cloud Datastore (Beta) connector uses to send and retrieve data.
Note
For beta access and to provide feedback, contact the Jitterbit Product Team.

To open it, use the Harmony portal menu to select Management Console > Cloud Datastore (Beta).
On the Cloud Datastore (Beta) page, you can do the following:
Create status storages
A status storage is the temporary storage component of the Jitterbit Cloud Datastore database. It can be used to track frequently changing endpoint data such as statuses and retry logic. This intermediate storage layer serves as a real-time reference for operational states without permanently storing data.
Note
Status storage data is retained for 90 days.
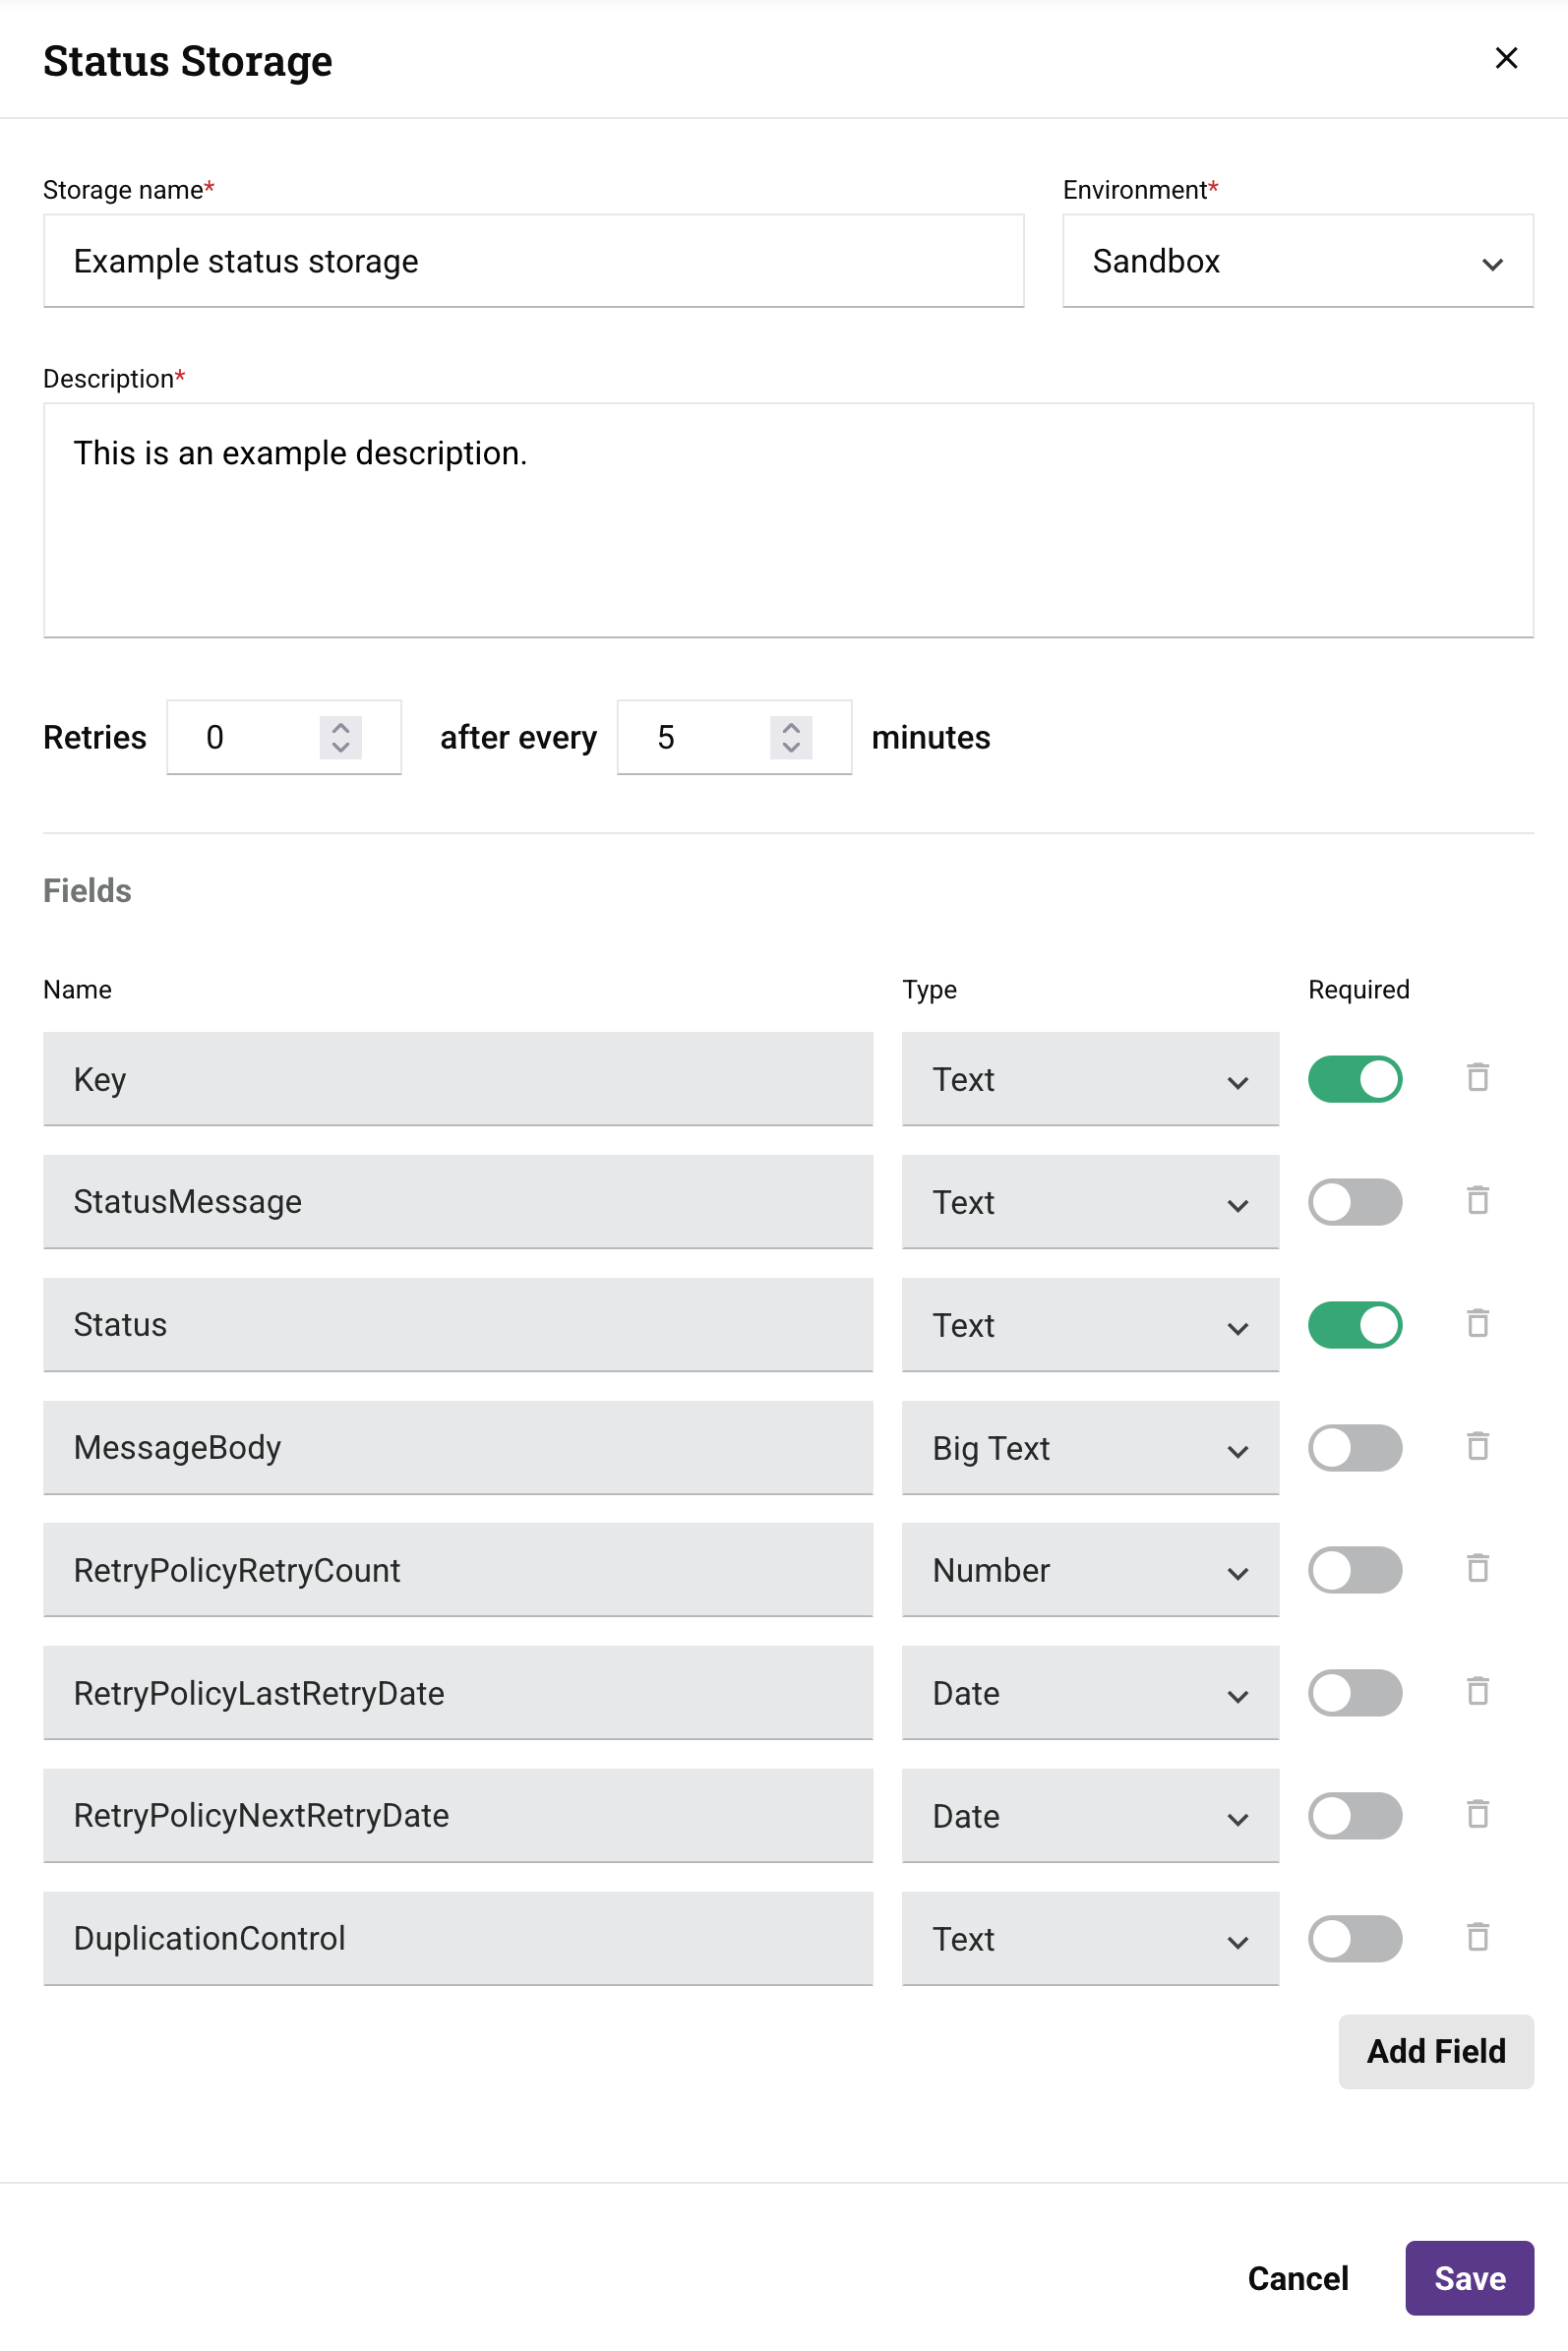
Add a status storage
To add a status storage, follow these steps:
-
Click , then select Create Status Storage. The Status Storage drawer opens:
-
Enter values for these fields:
-
Storage name: Enter a name for the status storage.
-
Environment: Select the environment that will use this storage. You cannot change this field after creation.
-
Description: Enter a description for the status storage.
-
(Optional) Retries: Enter the number of automatic retry attempts when data retrieval fails. Valid values range from
0to5retries. Once the number of retries has been met, the item is given aPERMANENT_ERRORstatus and is sorted into the Permanent error tab. -
(Optional) After every N minutes: Enter the wait time between retries (between
5and180minutes). -
Fields: The list of fields present in a Cloud Datastore (Beta) activity's request or response data schema.
- Name: The name of the field to retrieve from or send to the endpoint.
-
Type: The data type of the field, one of Text, Big Text, Number, or Date.
Note
Big Text is designed for storing large volumes of text data, such as
text,VARCHAR(MAX), orCLOB. The exact name and specifications vary by database system. -
Required: This setting is not currently functional. By default, all fields are optional with a cardinality key of
[0, 1]in the data schema. -
Delete: Deletes the field.
To add a custom field, click Add Field and then enter the Name and select the Type.
-
-
Click the Save button.
View status storage data
To view data for a status storage, hover over a storage and click the Details icon. The details drawer opens:

Status storage data is displayed in tabs categorized by an item's update status:

| Tab | Description |
|---|---|
| The Pending tab shows items that haven't yet received an updated status. | |
| The Temporary error tab shows items with potentially recoverable errors, such as network issues or timeouts. | |
| The Aborted tab shows items whose operation was intentionally stopped, or items moved here using the Moved to aborted icon. | |
| The Permanent error tab shows items whose operation failed due to issues that won't be fixed by retries, such as invalid inputs or permission problems. | |
| The Processed tab shows items whose operations completed successfully. |
Each tab's table has these columns:
- Key: The name of the key (set in an Insert Items activity) whose value is being mapped.
- Trying Amount: The number of retry attempts for items in the Temporary error or Permanent error tabs.
- Created on: The date (
MM/DD/YYYY) and time (HH:MM:SSAM/PM) in your local browser time when the item was created using an Insert Items activity. - Updated on: The date (
MM/DD/YYYY) and time (HH:MM:SSAM/PM) in your local browser time when the item was updated using an Update Items activity. -
Actions: These actions appear when hovering over a key's row:
- Show details: Opens a drawer displaying the item's Key, the number of retries performed, the wait time between intervals, and any Status message or Message body data.
- Move to aborted: Moves the item to the Aborted tab (this action is not available on the Aborted tab).
- Delete: Deletes the item from the status storage. When clicked, type
DELETEin the dialog's text field, then click the Delete button to confirm.
-
Next: View the next storage in the table.
-
Previous: View the previous storage in the table.
-
Expand: Expand the drawer to fill the browser window.
-
Close: Close the drawer.
Note
Each row in the details drawer is considered an item in the Cloud Datastore (Beta) connector. For example, when using a Delete Items activity, any specified rows are deleted.
Create key storages
A key storage is the long-term component of Cloud Datastore. It stores key-value pairs and structured data, such as cryptographic keys and credentials. Data in a key storage register remains until it is manually deleted, either using the Delete icon (described in Delete a register) or via a Cloud Datastore (Beta) Delete Items activity.
Add a key storage
To add a key storage, follow these steps:
-
Click Add Storage, then select Create Key Storage. The Key Storage drawer opens.
-
Enter values for these fields:

-
Storage name: Enter a name for the storage.
-
Environment: Select the environment for the storage. You cannot change the environment after saving.
-
Description: Enter a description for the storage.
-
Fields: These fields are provided by default and cannot be changed or removed:
- Key
- Alternative key
- Value
To add a custom field, click the Add Field button and enter the following:
- Name: Enter the name of the custom field.
-
Type: Select the data type of the field, one of Text, Big Text, Number, or Date.
Note
Big Text is designed for storing large volumes of text data, such as
text,VARCHAR(MAX), orCLOB. The exact name and specifications vary by database system. -
Required: This setting is not currently functional. By default, all fields are optional with a cardinality key of
[0, 1]in the data schema.
Note
Once custom fields are referenced in an operation, they cannot be deleted.
-
-
Click the Save button.
Key storage registers
A register is a key-value pair or structured data that the Cloud Datastore (Beta) connector sends or retrieves.
Note
A key storage register remains until it is deleted, either using the Delete icon on this page or via a Cloud Datastore (Beta) Delete Items activity.
Add a register
To add a register to a key storage, follow these steps:
-
Hover over a key storage, then click the Details icon. The details drawer opens.
-
Click the New Register icon. The New register drawer opens.
-
In the New register drawer, set values for these fields:

-
Key: Enter the key for the key-value pair.
-
(Optional) Alternative key: Enter a secondary key that can access the same value.
-
(Optional) Value: Enter the value for the key-value pair.
-
(Optional) Custom fields: Set values for any listed custom fields.
-
-
Click the Save button.
Note
A register is considered an item in the Cloud Datastore (Beta) connector. For example, when using a Delete Items activity, any specified registers are deleted.
Edit a register
To edit a key storage register:
-
Open the details drawer for a key storage.
-
Hover over a key storage register, then click the Edit icon in the Actions column. The Edit register drawer opens.
-
Make changes to any of the fields, then click the Save button.
Delete a register
To delete a key storage register:
-
Open the details drawer for a key storage.
-
Hover over a key storage register, then click the Delete icon in the Actions column. The Delete register drawer opens.
-
Type
DELETEin the dialog's text field, then click the Delete button to confirm. Click the Cancel button to abandon the action.
View key storage data
To view the registers for a key storage, hover over a storage and click the Details icon. The details drawer opens and displays a list of registers:
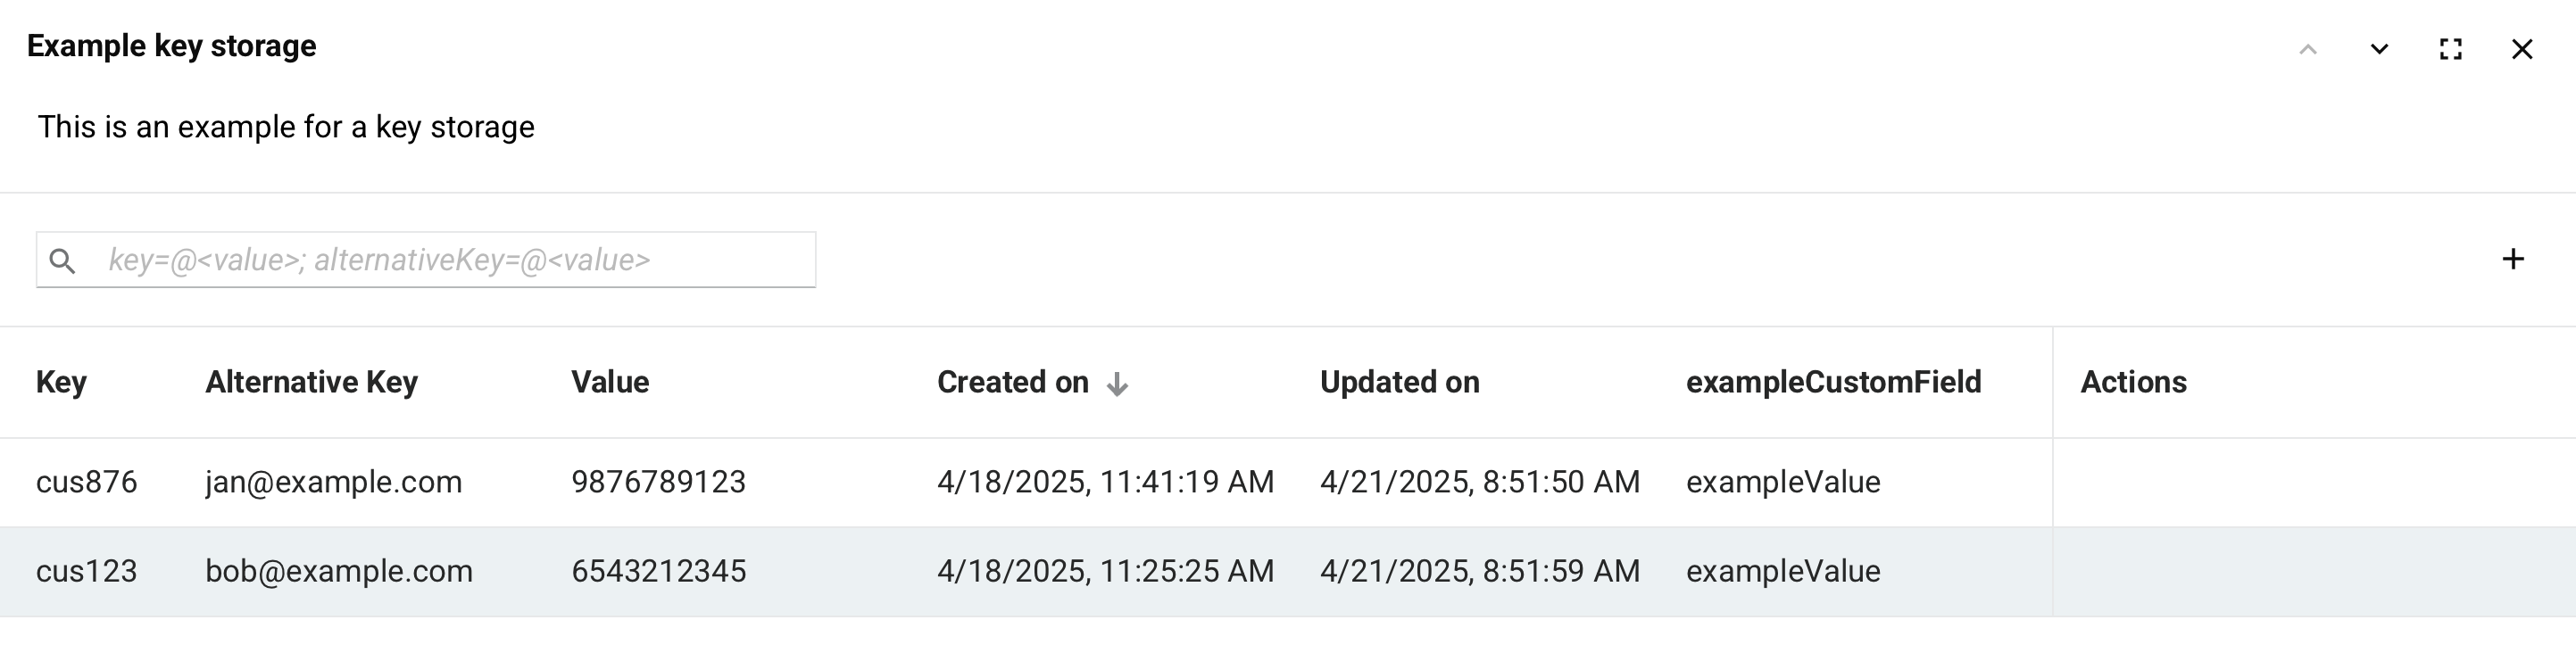
-
Key: The register's key.
-
Alternative key: The register's alternative key. This field is blank if no alternative key is configured.
-
Value: The register's value. This field is blank if no value is configured.
-
Created on: The date (
MM/DD/YYYY) and time (HH:MM:SSAM/PM) in your local browser time when the register was created. -
Updated on: The date (
MM/DD/YYYY) and time (HH:MM:SSAM/PM) in your local browser time when the register was last updated. -
Custom fields: Any custom fields appear in the remaining columns.
-
Actions: These actions appear when hovering over a register's row:
-
Delete: Deletes the register.
-
Edit: Opens the Edit register drawer. Make changes, then click the Save button.
-
-
Next: View the next key storage in the Cloud Datastore table.
-
Previous: View the previous key storage in the Cloud Datastore table.
-
Expand: Expand the drawer to fill the browser window.
-
Close: Close the drawer.
Edit a storage
To edit a status storage or key storage, follow these steps:
-
Hover over a storage, then click the Edit icon in the Actions column. Its configuration drawer opens.
-
Make changes to the fields, then click the Save button.
Delete a storage
To delete a status storage or key storage, follow these steps:
-
Ensure all data (such as registers) in the storage is deleted first. Otherwise, this error will occur:
Failed to delete storage: <storage name> - Storage with ID <storage ID> cannot be excluded because it contains items. -
Hover over a storage, then click the Delete icon in the Actions column. The Delete Storage dialog opens.
- Type
DELETEin the text field, then click Delete to confirm. Click Cancel to cancel the action.